

WhatsApp API Setup: The Complete Step-by-Step Guide (2026)

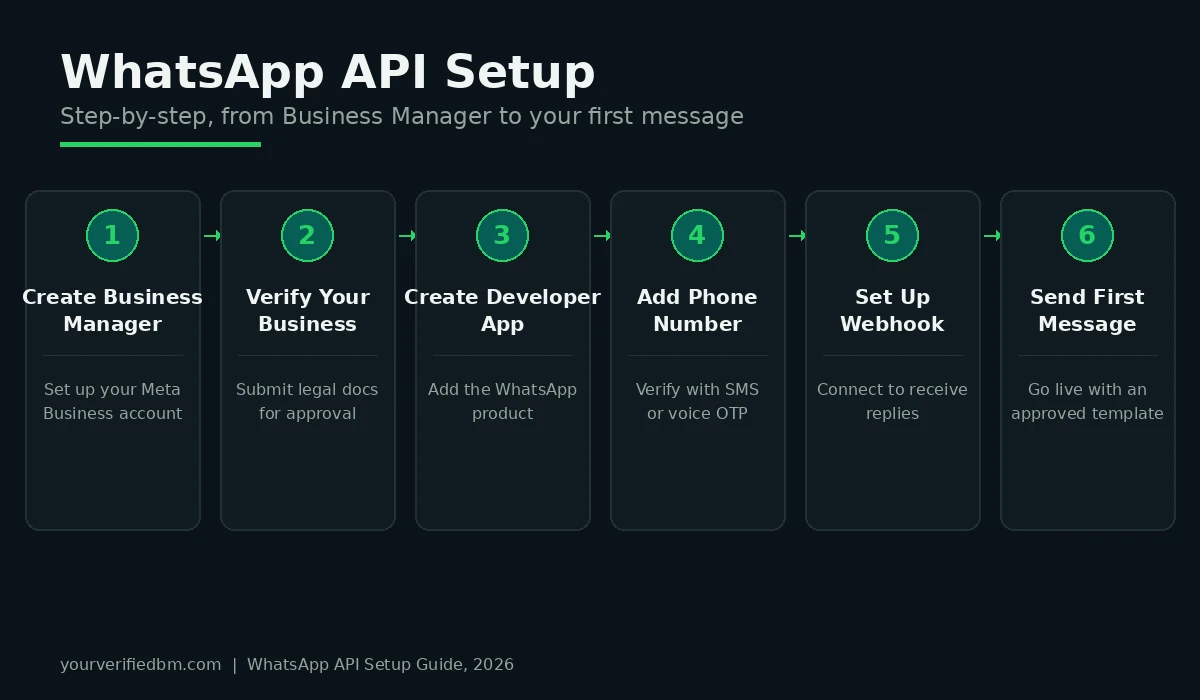
WhatsApp API Setup: The Complete Step-by-Step Guide (2026)
WhatsApp API Setup looks intimidating the first time you try it — Business Manager, app IDs, access tokens, webhooks — but broken into steps, most businesses can go from zero to sending their first message in under an hour. This guide walks through the entire WhatsApp API Setup process from scratch, with no prior developer experience assumed.
Quick Summary
- WhatsApp API Setup starts with a verified Meta Business Manager account — this is the foundation everything else is built on.
- You’ll create a Meta Developer app, add the WhatsApp product, and connect a phone number.
- You can complete WhatsApp API Setup either directly through Meta’s Cloud API or through a BSP (Business Solution Provider) like Twilio, 360dialog, or Wati — each has trade-offs covered below.
- Message templates must be submitted and approved before you can send anything outside the 24-hour customer service window.
- Most businesses finish initial WhatsApp API Setup in 30–60 minutes; business verification is usually the slowest step.
Before You Start: What You’ll Need
Before beginning WhatsApp API Setup, gather these:
- A Facebook account tied to a real person (not a fake profile — Meta checks this during verification)
- Your business’s legal name, address, and a document proving it (business registration, tax ID, or utility bill)
- A phone number that is not currently active on WhatsApp (personal or Business App) — you’ll need to migrate or use a fresh number
- Access to that phone number to receive an SMS or voice OTP
Step 1: Create a Meta Business Manager Account
Go to business.facebook.com and create a Business Manager account if you don’t already have one. This is the umbrella account that will own your WhatsApp Business Account (WABA), ad accounts, and any team members you add later. Every later stage of WhatsApp API Setup happens inside this Business Manager.
Fill in your business name, your own name and email, and your business details exactly as they appear on your legal documents — mismatches here are the most common cause of verification delays.
Step 2: Verify Your Business
Inside Business Manager, go to Business Settings > Security Center > Start Verification. Meta will ask for:
- Legal business name and address
- A business document (registration certificate, tax filing, or similar)
- A phone number or email at your business domain
Verification can take anywhere from a few hours to a few business days. This step is often the bottleneck in WhatsApp API Setup, so start it first and work on the technical steps while you wait.
Step 3: Create a Meta Developer App and Add the WhatsApp Product
Head to developers.facebook.com, click Create App, and choose the Business app type. Once the app is created:
- From the app dashboard, click Add Product
- Find WhatsApp and click Set Up
- Link the app to your Business Manager account when prompted
This is the point where WhatsApp API Setup becomes concrete — Meta will generate a test phone number and a temporary access token automatically, so you can start testing immediately.
Step 4: Add and Verify Your Phone Number
Meta gives you a free test number to experiment with, but it can only message a handful of approved recipients. For production use:
- Go to WhatsApp > API Setup in your app dashboard
- Click Add Phone Number
- Enter your business number and choose SMS or voice verification
- Enter the OTP you receive
If this number was previously used on WhatsApp (personal or Business App), you’ll need to migrate it — Meta will walk you through deleting the old account first.
Step 5: Generate a Permanent Access Token
The temporary token from Step 3 expires in 24 hours, which isn’t useful for a live integration. To finish this part of your WhatsApp API Setup:
- Go to Business Settings > Users > System Users
- Create a new system user with Admin access
- Assign it to your app with whatsapp_business_messaging and whatsapp_business_management permissions
- Generate a token and set it to never expire
Store this token somewhere secure (a secrets manager, not a plain text file) — it’s effectively the password to your WhatsApp Business Account.
Step 6: Choose How You’ll Connect — Direct Cloud API or a BSP
At this point in WhatsApp API Setup you have two paths:
- Meta Cloud API (direct) — free to connect, hosted by Meta, best if you have developer resources to build your own integration and webhook handling.
- BSP (Business Solution Provider) — platforms like Twilio, 360dialog, Gupshup, or Wati sit on top of the Cloud API and add dashboards, automation, CRM integrations, and support. Faster to launch, but comes with a markup on top of Meta’s rates.
If you’re not building custom software in-house, a BSP usually gets you to a working WhatsApp API Setup faster and with less maintenance.
Step 7: Set Up Webhooks to Receive Messages
Without a webhook, you can send messages but you won’t receive replies or delivery statuses. To complete this part of your WhatsApp API Setup:
- Go to WhatsApp > Configuration in your app dashboard
- Enter your webhook URL (an HTTPS endpoint you or your BSP controls)
- Enter a verify token and subscribe to the messages field
- Confirm the webhook by responding to Meta’s verification request
If you’re using a BSP, this step is often handled automatically inside their dashboard.
Step 8: Create and Submit Message Templates
Any message sent outside the 24-hour customer window must use a pre-approved template. In WhatsApp Manager > Message Templates:
- Click Create Template
- Choose a category — Marketing, Utility, or Authentication
- Write your message, using
{{1}},{{2}}etc. for dynamic variables - Submit for review
Approval usually takes minutes to a few hours. Templates that sound promotional but are tagged Utility are the most common rejection reason, so match the category honestly.
Step 9: Send Your First Test Message
With a verified number, a permanent token, and at least one approved template, you’re ready to send a real message. Using the Cloud API, this is a simple POST request to the /messages endpoint with your recipient’s number and template name. If it delivers successfully, your WhatsApp API Setup is functionally complete.
Step 10: Go Live and Scale Your Messaging Limits
New WhatsApp Business Accounts start on a limited messaging tier (often 250 unique users in 24 hours). This limit increases automatically as you maintain good quality ratings and send consistent volume. Monitor your Quality Rating and Messaging Limit inside WhatsApp Manager — a drop in quality can freeze your account, so warm up gradually rather than blasting your full list on day one.
Common WhatsApp API Setup Mistakes to Avoid
- Using a number still active on WhatsApp — always migrate or use a fresh number
- Mismatched business details between Business Manager and your legal documents, which stalls verification
- Letting the temporary token expire mid-project — generate the permanent system user token early
- Mislabeling template categories to avoid Marketing rates — this gets templates rejected or accounts flagged
- Skipping webhook setup and wondering why replies never arrive
Once your WhatsApp API Setup is live, keep an eye on your ongoing costs — see our complete guide to WhatsApp API Pricing for a full breakdown by message category and country.
Frequently Asked Questions
How long does WhatsApp API Setup take? Most of the technical steps take under an hour. Business verification is the main variable — it can take a few hours or a few business days.
Do I need a developer to complete WhatsApp API Setup? Not necessarily. Direct Cloud API integration benefits from developer help, but most BSPs offer no-code dashboards that make WhatsApp API Setup accessible to non-technical teams.
Can I use my personal WhatsApp number for the API? Yes, but it must be migrated first, and you’ll lose access to the regular WhatsApp app on that number once it’s connected to the Business API.
What’s the difference between the Cloud API and a BSP for WhatsApp API Setup? The Cloud API is Meta’s free, direct integration that requires your own developer resources. A BSP adds a dashboard, support, and automation tools on top, for a markup.